If you are new to Xepg
On first run Xepg asks you to browse to the DVBViewer.exe. Then you must decide whether the import should go into DVBViewer or the DMS:
Xepg → Options → General
If DVBViewer Media Server is chosen you must enter your credentials:
Xepg → Options → DVBViewer Media Server
Almost all windows in Xepg have a Help botton. NOTE: You will need the full version of DMS. The DMS Basic won't work. Don't use the guest account.
First of all you need create an account at WebgrabPlus (wg++). If you want to judge all what it can do for you: make a donation, click “Support us” then the PayPal image and remember to tick “Add €x,xx EUR to help cover the fees.”. It can take up to 12 hours for your licence to be activated. See
CONTACT → My Account
When your licence is activated you will also get your License pass code. Download the Software and run the installer as administrator.
This guide will assume the import goes into the DVBViewer Media Server (DMS), but will also work if the import goes into the DVBViewer. Easiest if you at some time want to upgrade to the the full version of DMS.
When the software is installed, the WebGrabPlus configuration folder is opened, it is
C:\Users\[Windows user]\AppData\Local\WebGrab+Plus
That will not work with the DMS, so create a new folder, say
D:\WebGrabData
and copy all files in the configuration folder to that. It is recommended make a shortcut to that folder on your desktop. Open Xepg and click Add
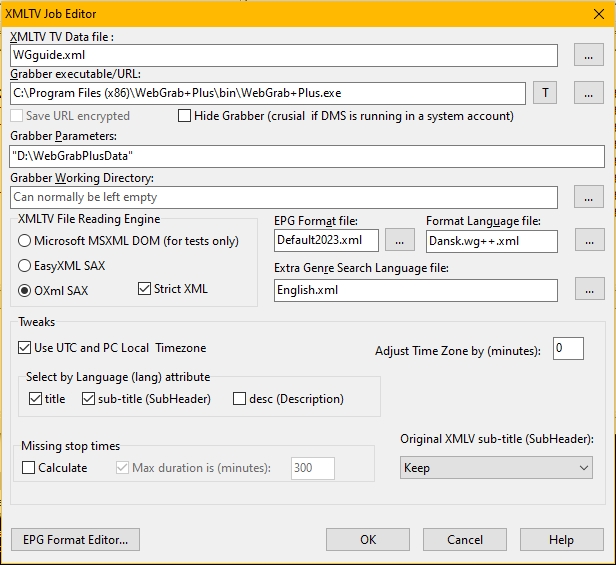
XMLTV Data file: It's a filename of your own choice. Will be used later,
Grabber executable/URL: Use the browse button to ensure it is correct.
Hide Grabber Leave it unchecked while experimenting.
Grabber Parameters: The double quotes are only needed when the folder name contains space(s), but makes no harm.
EPG Format file: and Format Language file: Select your own according to your needs.
Click OK to save settings.
You can now run the WebGrab+Plus.exe just by clicking the “Run Grabber(s)” button in the Xepg Main window, or if you prefer create a .BAT file containing the line
“C:\Program Files (x86)\WebGrab+Plus\bin\WebGrab+Plus.exe” "D:\WebGrabPlusData"
You can't run it just by clicking the WebGrabPlus icon. That would assume the default configuration folder.
Open the folder D:\WebGrabPlusData in explorer. Open folder siteini.pack and locate your country (there are many!). We will use Denmark as example:
Here the files are:
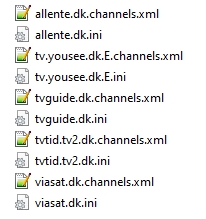
We
will grab epg from the sites tvguide.dk and tvtid.tv2.dk, so we copy
those 4 files (with extensions .ini or .channels.xml) to folder
siteini.user.
Open the files tvguide.dk.channels.xml, tvtid.tv2.dk.channels.xml and Webgrab++.config.xml in a text editor. Notepad++ is recommended, since you can have them all open at the same time.
All comments (starting with <!-- ) are removed and one channel copied from each of the .channels.xml files.
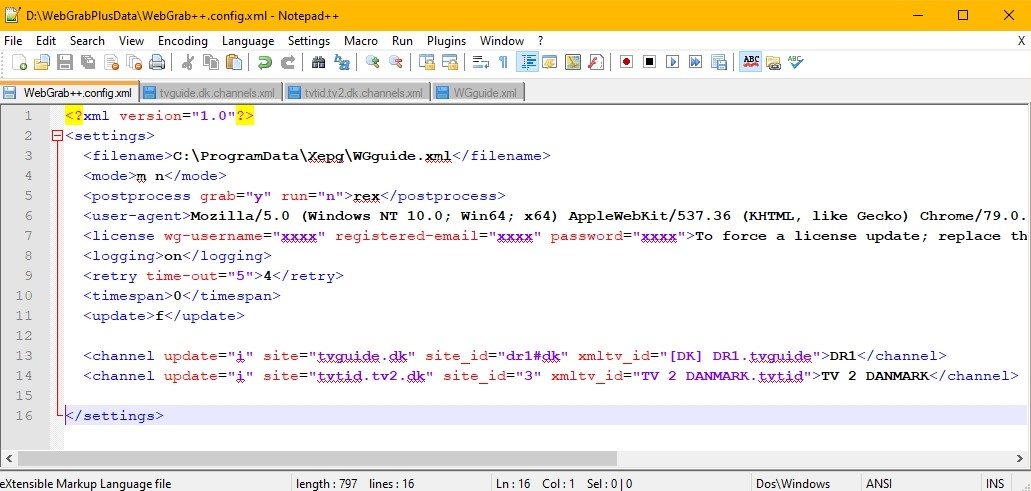
<filename> Must be the same as entered in Xepg (WGguide.xml).
<licence> Enter the real values instead of xxxx. Password is the same as License pass code mentioned earlier.
<timespan> 0 means grab 1 day ahead.We want things to go fast while experimenting.
<channel> The xmltv_id attribute is edited by adding .tvguide and .tvtid. Useful when grabbing from different sites. Furthermore the channel names DR1 and TV 2 DANMARK are corrected to the exact channel names as they appear in DVBViewer: Makes channel pairing easier.
To create (grab) the file WGguide.xml. Launch Xepg and click Run Grabber(s) button. If something goes wrong try to temporarely have <update>c</update> to update your channels.xml files. Switch back to f again and retry. If still problems post in WebgrabPlus forum. The .ini file(s) might need an upgrade. Take a look into the files Webgrab++.log.txt and WGLicence.log.txt.
Next step is to make a Channel Pairing. Click that button on Xepg Main window. DVBViewer is launched if not running. TIP: Have DVBViewer open while experimenting. After some file analysing you see:
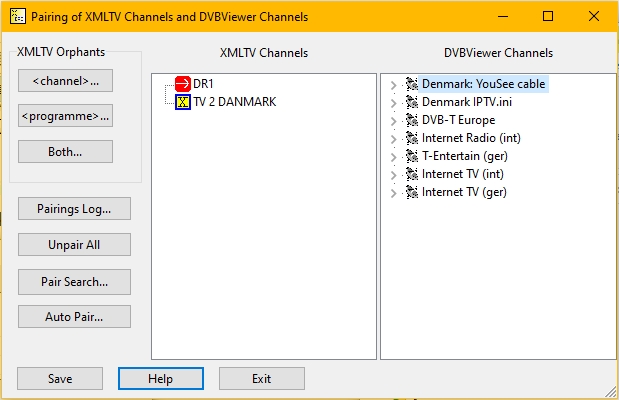
Click
Auto
Pair...,
then in the next window click Go!
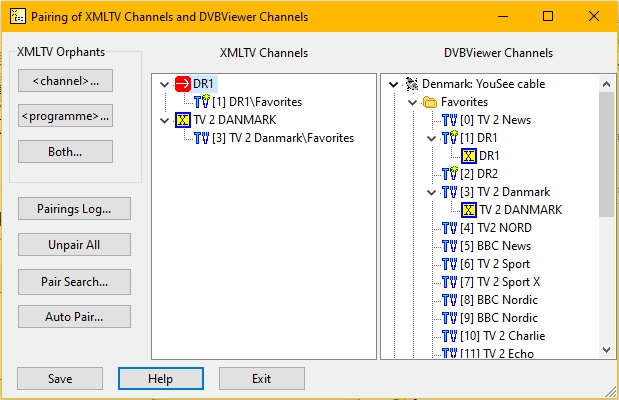
Looks
right. Pairings are shown as subnodes in the trees. if it's not
right, click Help.
Click Save
then Exit.
Click Test Import. If you import into DVBViewer you should see the new EPG here, if DMS is used you should see it in the web interface of DMS (click your browsers refresh button if not).
Check Hide Grabber in the XMLTV Job Editor (In Xepg Main window, click on the job, then the Edit button). It's a no go on a movie night and could be a disaster if the DMS is running in a windows system account.
Click the link Automate at a123.dk and follow the instruction there.
Once every thing is working: add more xmltv channels and set up the <timespan> in WebGrab++.config.xml file to say 6 (one week) or whatever you want.
Whenever you add or delete <channel> items a new channel pairing is needed. If you delete <channel> items a red dot appears next to the Both... button. Click on it and delete those channels and their pairings.
To make sure you have the latest .ini files run the SiteIni.Pack.Update.exe located in the same folder as WebGrab+Plus.exe. This will update the files in the default wg++ configuration folder. You will have to copy to D:\WebGrabPlusData.
If you find a site with a good TV listing, you can ask in the wg++ forum for an .ini file for that site.
This one can do much the same as the Xepg Format Editor. No need to use that.
wg++ MDB postprocessor
This one can improve the xmltv file with information from movie sites like iMDB. Dokumentation at wg++ site.
A standard donation gives you 2 licences. A licence is tied to your windows user account. If DMS is running in a windows system account (the default) there is another windows user in play: SYSTEM. You can then only run wg++ on that pc. That's all you normally need since the DMS can distribute the imported EPG to all of it's DVBViewer clients on your network, furthermore other DMS clients (e.g. KODI) will see the EPG as well.